Q.In what ways does your media product use, develop or challenge forms and conventions of real media products?
A. The media product we have created has developed on many various forms of technology offered today. Our piece took full advantage of video uploading software, as our final piece was exported in a HD format and uploaded to a popular video sharing site called “Vimeo”, which is different to “Youtube” which has an array of different themes whereas “Vimeo” concentrates on creative mediums. Our media product was also shared on a social networking site “Facebook” so that we were able to take comments and criticisms and work on them before we finally handed in our finished piece. This helpful source of sharing our media and allowing comments to be given is definitely using forms of media/technology to our advantage. Our film has also helped our group learn and understand the various aspects of the process in which a movie is made, the journey from brainstorming, to story boards, to filming and finally editing our piece. We edited our piece on iMovie, after editing certain clips together, our skills were updated as we went along, so we always went back to change previous parts. It’s almost a grow-s you-learn process. We also used image editing software (Photoshop) to create a DVD cover and a movie poster; these were developed from DVD covers and posters we have seen in other movies.
What kind of media institution might distribute your media product and why?
Seeing as our film is a British independent film, running on a moderately low budget. It would be seemingly obvious that our film would be distributed by a british film institution.
Like various british indie productions such as Shaun of the Dead (produced by Film4) and 28 days later (British film council & DNA films)
I feel our film would be suited for these types of institutions, preferably film4 as it has alot of coverage in Britain and is well respected in British film making. I feel the financial aid given by these will help distribute around the UK and create a classic.
Who would be the audience for your media product?
The initial audience for our piece was teenagers, even though we changed our idea since then, we still kept the beleif that our media product should be based around teenagers. Teens hold alot of market in the cinema industry , around the age of 15-21, those still in education, be it secondary school or university. We felt teens would show more regard to our film as it is set in a school environment, and they can get a warmer feel for the film are currently in education, people can almost put themselves in the characters place and imagine how they would feel if they were in the same situation as our main character.
Teens do hold the main interest in this film but it can also broaden to adults as they could go watch it with parents as such, our film doesn't solely have teen relevance, it features tension and thrill that adults can enjoy, they might even relate as they were in a school environment once themselves.
Q. How did you attract/address your audience?
We uploaded our preliminary video to youtube and facebook and gained constructive criticisms which we took into account and went back and adapted our piece to. These criticisms were very much needed as what may seem clear / normal to us , may not in fact be the case with others, so this gave us an insight into others thoughts and in turn we could create a piece everyone would enjoy.
Also uploading, the non-final version made people eager to see the actual version , and people were pleased to see the changes we made.
We designed a poster and a DVD cover developed from other successfully marketed films which would hopefully attract the audience, we left the poster rather ambiguous so that an array of people would be interested in finding out about the movie.
Q. What have you learnt about technologies from the process of constructing this product?
A. We believe that we as a group were quite proficient with the use of the camera thanks to the quick crash course before we were given the cameras and due to 3 having done photography based courses making us quite apt with cameras of this sort.
The editing software that we used i.e. iMovie was difficult at first which is shown in the quality of production in our 2 continuity pieces but as the course progressed we learnt how to use the features of the software more efficiently. During the duration we were using the editing software we learnt how to; resize images, slow down video clips, adding effects such as transitions and trimming audio clips to get the sounds that we required and remove all unnecessary audio. Learning how to use iMovie showed us how to create a piece that flows well in all aspects this includes; sounds, image and text.
Blogging is a new process we learnt; posting our ideas and on the web in a for of an online diary . Through the use of blogging we learnt how to structure posts & implement images / videos in html code.
Q. Looking back at your preliminary task, what do you feel you have learnt in the progression from it to the full product?
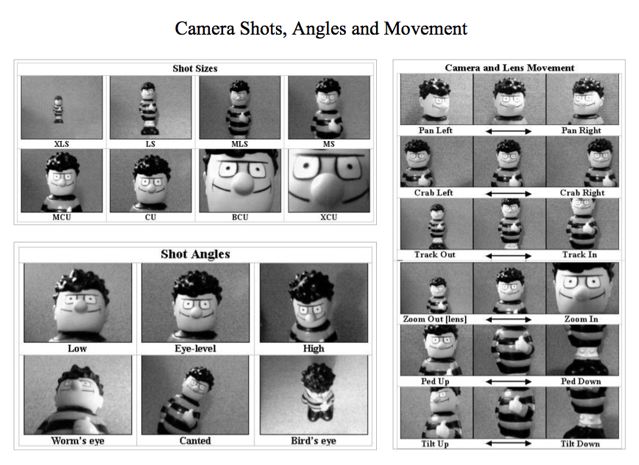
A. I think we have learned to understand and implement the process that creators of a media presentations have to go through, from getting the ideas, to their development all the way to putting it all together and hearing and understanding what people have to say about it. During the course of this project I think we have all learnt a lot of new skills whilst film making as well improving on some of our original skills such as our development in keeping a steady hand whilst holding the camera alongside how we use shots and angles effectively to create the desired atmosphere.
For our mise-en-scene we chose to use an empty school as this allowed us to achieve the feeling of ‘horror’ and give the isolated atmosphere and raise suspense. However, because we had the school empty during the holidays and weekends it provided us with plenty camera shots and angle opportunities e.g. the extreme long shot we captured from the inside the school window that go across the road, an impossible shot to do during school hours as we used our phones during to shoot to signal to go which would have been a distraction to a lesson. We found the use of sound to build up the suspense in the atmosphere quite simple. The original sounds that were captured during shooting e.g. cars, children playing in the background and the school bell were all muted out. We added 3 different tracks over the production and kept the dialogue to a bare minimal this is because we believed that it would build more tension. iMovie provided us with the diegetic sounds we were searching for such as the loud bang the occurs in the last quarter in the film that raises tempo a it nears its end.
The editing of the film was longest and most tedious and but by far one of the most fun parts of our media project. We would have to spend our afternoons and lunch times in class editing. Often we would leave the edited piece, return to watch it in an hour or maybe even a day and would then see all the small glitches and minor errors that we overlooked and so we would go back out to shoot the scene again to make sure that the piece flowed correctly whilst maintaining its consistency. I think that we have all learnt how to use iMovie more effectively, learning skills such as how to put in text and to blend in colours to give off an eerie feel that makes the piece feel more like a 'horror'.
With the course at its end we recognise that teamwork is essential in creating media forms and to meet deadlines. working together as a group was at times quite frustrating, however we had a lot of fun working with each other none the less.
Evaluation/Thoughts
2 minute piece
This is the final piece, it took us quite a while to get it to the final product it is now but it was worth it. Looking back on it there are still some things we would wish to improve such as use of more distant shots and the 360 shot we wanted to add but couldn't quite get right. The editing took the longest , which was a task we all thought would be the quickest in the begging, but as a team we pulled through and created a piece that flows well.
Our team hope you enjoy watching our piece , and thank you for taking the time out to view it.
Peer review
We uploaded our final piece onto Facebook so that we could receive constructive criticisms from our peers. We received a lot of positive feedback that described our work as 'sick' (slang for great) amongst other positive comments.
Final Poster

This is the final promotional poster made in photoshop Cs3 by Amin, this encompassed all the different ideas we gained from looking at various horror movies over time , such as the red font , ghastly writing , and dark silhouettes.
Fonts
I started looking on font websites to get a font that would blend in to our opening scene , I was looking for something that was simple (professional) and minimal to draw suspense.

Opening credits
Today our teacher gave us advice and examples of different title scenes and how we could implement credits into the opening scenes effectively. For example fades (to white & black) , transitions, different font styles etc.

Here is an example of a title scene, a shot that is symbolic of the title, with a simple font in a white colour which matches the clouds.
Soundtrack
The soundtrack consists 3 different tracks; 'Fortunate sleep - no one disturb her dead' and 'Suicidal Clock Chime' from the Silent hill 4 soundtrack and 'track 6'. Because the songs are copyright we sent a letter to the copyright holder of the songs to ask for permission to use them in our media piece (see print screen below).

DVD Cover
We had a look at different movie posters/covers so that our group could find some inspiration for our own.
In this post we will show some different posters and covers from various horror movies that we felt conveyed the "horror" theme.

Blood is used in this and shows contrast between the rest of the clean image.

The exorcist movie cover. Use of sillhouetting to create uneasiness / darkness / suspense.

Triangle DVD cover. Ratings used to promote movie. Use of bold fonts exadurating words to entice viewer. Scared facial expression & contrast between blood & no blood.
The red font seems to be a re-occurring feature in horror movie titles..
These are but some of the examples we looked at. In our group discussions we viewed various others. We began shooting our main character so we could create a promotional material such as DVD covers & posters.
The DVD cover (below) was created in photoshop CS3 by Amin , we drew inspiration from movies 19** movies such as Dracula and new age movies such as SAW VI and Triangle which primarily use the colour red on the covers and text to symbolise blood and gore to give a feel of horror before even viewing the movies.

Poster & Promotion
Below are the rough mock-ups, shots and final draft of the movie poster. The shots were inspired by movies such as Panic room and *insert*, we tried to use the dark in the shots to create a sense mystery and ambiguity as to what could be lurking around the corner and to what else is lurking about. The mock-ups were created in photobucket whereas the final poster was created in Photoshop CS3 this evidently shown in the quality in design provided by the two different design programmes.


Photo shots taken for the poster

Holiday shooting
We came into school over the holiday so that we could begin filming segments of our final piece; we took the opportunity to come in over the holidays so that we could capture the school at its most empty, this was so that we could produce an eerie atmosphere complimented with an perturbed feeling. As a group we were undecided about whether our piece should be produced in colour or black and white so we decided to shoot in colour; this way if we are not satisfied with the result it can be edited into black and white. I believe that black and white will be a more suitable colour for our horror as it gives a type of nostalgic effect, also when using B/W filming can be done at any time regardless of whether (so there isn't a problem with continuity) additionally it gives of an array of colour scales giving of an eerie effect
Whilst filming we tested with a range of shots that we believed would give of a "horror" feel; for some of these shots we needed a clean pan, so we used a skateboard to get a smoother rolling effect.
Additional effects we experimented with was use of silhouettes using the flashlight feature so it gave the effect of someone watching the main character. Another skill we used was selective focusing. More filming needs to be done, this way we can edit our piece and add sounds such as footsteps and door closes.
Lighting influence

Here is an image we came across on the internet, the group thought that the lighting was very effective and could possibly be used in the first few minutes of our movie. The image gives a sense of uncertainty and fear which is exactly what we would be trying to show in our horror. The view is a close up as well which suggests quick reactions in this example.
We must use put lighting to proper use in our film , as this is what makes the difference between a normal shot , and an eerie shot.
Inspiration

A recent film Amin saw the group can draw inspiration from is Triangle. It is a Horror under the subclass of a psychological thriller. The story line has many plot twists within it and keeps the viewer on edge and picking up clues throughout. Also a lot of things done in this film are ambiguous and leave things up to the user to piece things together, which our group should draw some attention to. This movie also has less gore scenes as most generic horror films do i.e the "Saw" saga and Hostel. It needs more thought from the audience and we feel this is more useful than just having gore on screen non stop. In turn due to this having less violence as such , other aspects become more apparent , such as lots of uneasy camera shots, "gritty" close-ups, use of sound and notably a scene where she meets herself and there is a 360degree pivot around them. Things which our group can emulate in our own piece.
Here is the theatrical trailer, the example of the camera turn when the characters meet can be seen here.
Some new ideas

![]()
Development of Ideas

Our original idea for our media coursework was to create a teen romance of some sort, however the group later agreed on a horror based film as the use of camera angles and shot, soundtrack were deemed more 'interesting' so we started on the production of our horror movie.
To find some ideas on what our movie clip will have and the ideas around it's concept, I created a brief brainstorm (using www.bubble.us) highlighting some various features and aspects of a horror film. I will use this to help my group further create an idea of how we should carry out our horror production and I will also elaborate on some if these points in later posts.
(full image found here)
Storyboards
The group needs to produce 3 different storyboards; 2 of the 3 storyboards belong to the continuity pieces for 30 second films, the last belongs to the main piece that lasts 2 minutes . The 30 second films are to show that we can produce a film which is consistent in plot, characters and events, which is necessary to any type of film making as it shows that we can produce a film that flows and is consistent. Keeping consistenc will help us to attain the highest possible grades
Storyboard for the 1st continuity piece (scanned by the school computer)
Storyboard for the 2nd continuity piece (picture taken by the HD cameras)
Our groups first impression from using the cameras is that we personally found the cameras relatively easy to use from remembering the demonstration and the quick refresher we were given before we were handed them. We have agreed that with practice the cameras will become easier to handle and our skill with them will improve.
Getting the cameras
Today in our lesson we were handed the new camera's that we will be using. It's called the JVC Everio GZ-HD40.Each group was asigned one of these. It's very hi-tech for our level so we had time to play around with it to learn how to use the camera and it's features. We then started to record various camera shots and angles as a test which I will upload in a later post. It has a large hard-drive so we can record lots of different cut's/scenes without having to worry about not having enough memory for leanghty recordings. It also records in HD so our production will be the same quality programs are broadcast at.
Here are the specifications of the camera :
Recording Format: 
Hard Drive
Optical Zoom:
10x
HDD Size:
120 GB
Weight:
0.54 kg
Audio format:
5.1 Surround Sound
Optical Zoom:
10x
Digital Zoom:
200x
Lens Focal Length:
4.5 - 45 mm
Filter Diameter:
43 mm
Horror conventions

Wikipedia has it's own definition of the horror genre which is ;
"Horror films are movies that strive to elicit the emotions of fear, horror and terror from viewers. Their plots frequently involve themes of death, the supernatural or mental illness. Many horror movies also include a central villain."
About Our Film
The genre of our film is that of a horror. Our film gere started of as a teen-romance, however after we finished our two continuity piece we reached the conclusion that we could create a better horror through use of eerie shots and that we could use little to no speech at all to build tension within the first 2 minutes.
After we reached the conclusion of the genre we started to brainstorm our ideas and stared watching a few intros to real horrors such as Panic room and Triangle in both lesson and at home, below is a brainstorm of a members brainstorm
Finally we decided on our plot for our piece, a member of our group (Amin) brought forward a very good plot, after we viewed all possible plots we decided on bringin to life his idea.